6 Apps to Enhance Your Instagram Pictures and Videos

If there is one app that I find myself opening more and more frequently, it’s Instagram.
The attractive images and videos provide a respite from a lot of the content on other social networks.
I’m not alone.
Instagram is growing at quite a clip.
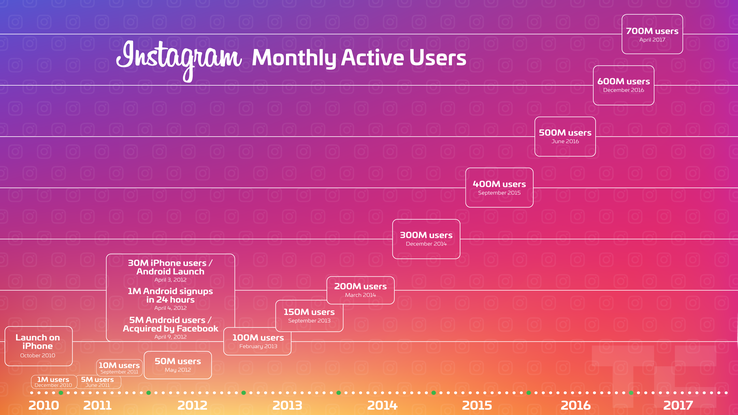
Today, it has over 700 million active users. At the rate it’s going, it will soon reach the billion mark that other platforms have reached, such as Facebook (its parent company) and Whatsapp.
When people thought that Snapchat would usurp Instagram, Instagram launched Stories.
The result?
200 million stories are shared per day, according to Facebook, and a lot of people are biting their nails over at Snapchat.
Instagram is not just pretty — it’s lucrative.
With high engagement rates and people with massive audiences, Instagram has reinforced the notion of influencers.
If you’re hoping to gain followers on Instagram, you have to create content that stands out.
That’s not easy to do.
Instagram is now home to the world’s top photographers, models, and celebrities.
Kendall Jenner has 82 million followers.
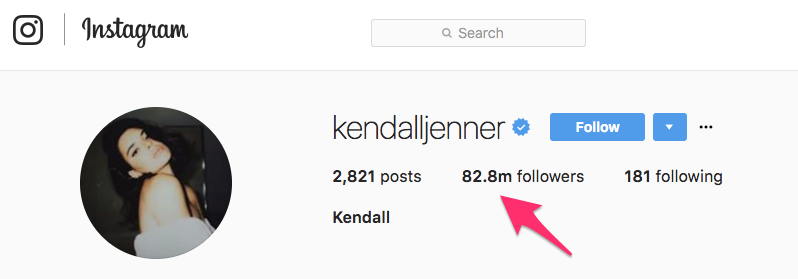
To put that in perspective, The New York Times has a circulation of under 1 million on weekdays, with 2 million digital subscribers.
The Instagram potential, therefore, is enormous.
How can you reap the rewards for yourself?
In this article, I’m going to show you how to use 6 apps to enhance your Instagram pictures and videos so that you can have content that breaks out and catches people’s attention.
But first, I want to explain why you should be enhancing your pictures and videos.
Why you should be enhancing your Instagram pictures and videos
I’m going to go out on a limb and assume that you are probably not a professional photographer.
If you were, you wouldn’t need my help understanding how different apps work.
Professional photographers do a lot of work with their equipment — equipment that’s out of most regular people’s price range.
Professional photographers also travel to places to captures extraordinary shots.
Take Alex Strohl. He frequently contributes to National Geographic.
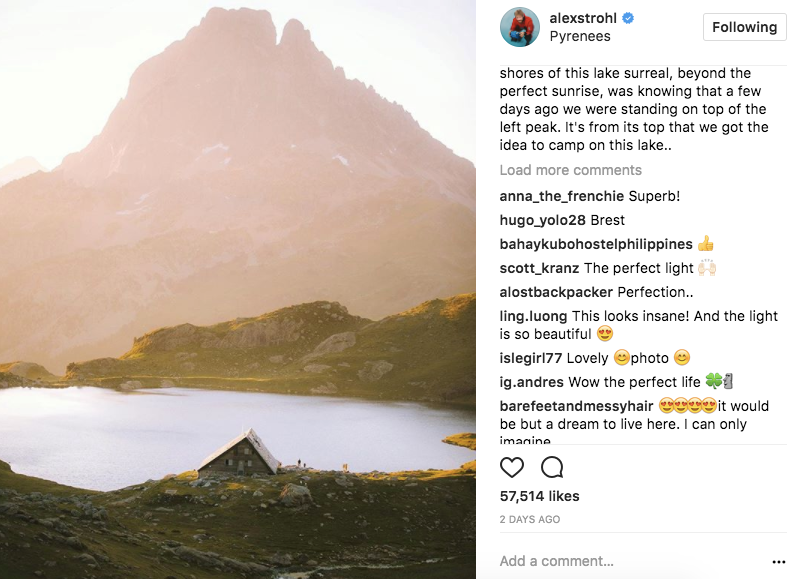
You can see why.
But you probably aren’t hiking in the Pyrenees on a daily basis, which brings me to the first reason why you should enhance your Instagram pictures and videos:
Reason 1. Your photos just aren’t that interesting by themselves.
I’m not saying that your photos aren’t interesting or that you aren’t interesting.
I’m saying that compared to the other content that’s being shared on Instagram, it’s very hard to compete on the subject matter.
Photos of you and your daily life are interesting to your friends who follow you.
Those photos are not very interesting to other people, though, because they don’t know you.
When you look at the people who have large audiences, they are almost all very attractive or very skilled at taking photos of images that make people dream.
Here is the list of the people with the most followers on Instagram:
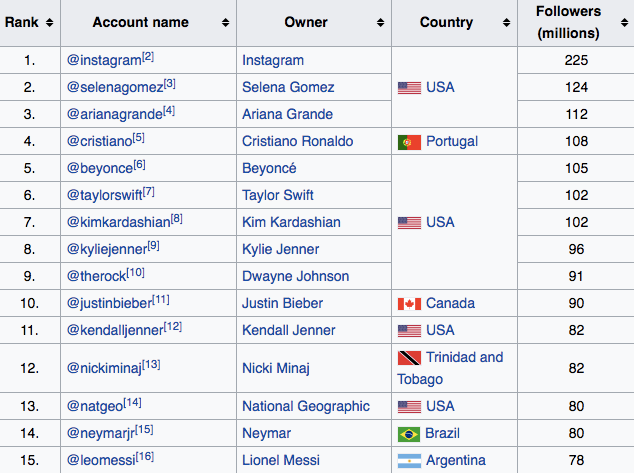
Selena Gomez could post a picture of her coffee and get 1 million likes. That’s because she has die-hard fans who love her for her music and persona.
You are trying to attract followers on Instagram who don’t know you.
You need to make your images super impactful and pretty.
The way to do that is by enhancing your photos.

Reason 2. Photography has rules.
Photography is a real profession with various rules and best practices that take years to master such as:
- Rule of thirds
- Depth of focus
- ISO
- Exposure
- Composition
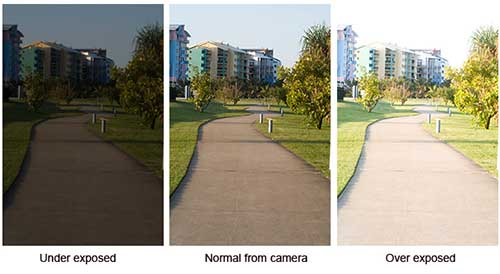
A lot of these things, like exposure and shutter speed, are highly technical.
What’s more, these options aren’t always available for adjustment on your smartphone.
Only advanced cameras will let you play with different settings to elicit certain effects the moment an image is taken.
If you’re shooting with a smartphone, you have no choice but to use an app to take your photo from OK to excellent.
Reason 3. You need a consistent graphic and visual style to gain followers.
When people follow you, they do it for a reason.
That reason is often the first bit of content that drew them in. Then, they might come to your profile to see what else you’ve shared.

Why?
Because they don’t know what to expect.
Look at the Instagram profile of Teresa C Freitas. Her style of soft pastel colors and open spaces is consistent and attractive.
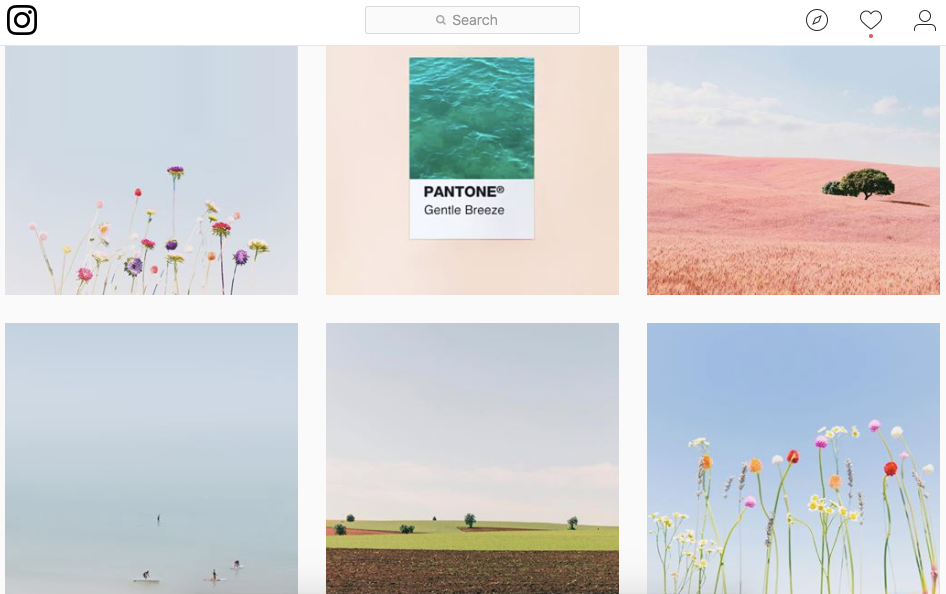
Having a coherent graphic style is a great way to get people to follow you. Once they see that you consistently post content that they find attractive, they will immediately follow you because they want to receive more content.
Apps can help you to develop a consistent graphic appeal. Some will even let you save combinations of settings so you can rapidly apply them to future images.
Now that you understand why enhancing your Instagram pictures and videos is so important, let’s take a look at some of the best apps to do just that.
6 Apps to enhance your Instagram pictures and videos
App 1. Snapseed

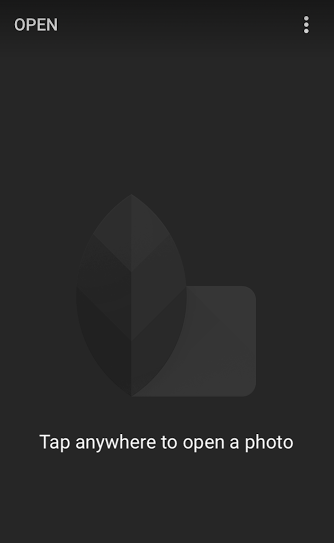
It’s the go-to reference and one of the highest rated image-editing apps out there. Snapseed is a free, fully functional app that lets you do all kinds of things to make your images magnificent.
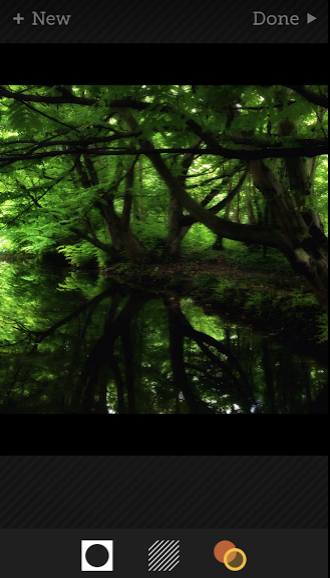
To get started, click anywhere on the home screen to open an image.
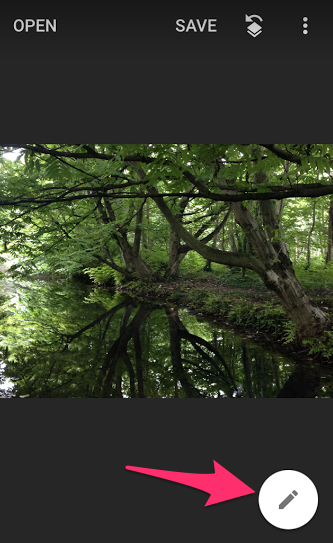
I’ll use a picture of a little stream in a forest that I recently took.
All of the editing options are under the button at the bottom right of your screen. Click on it.
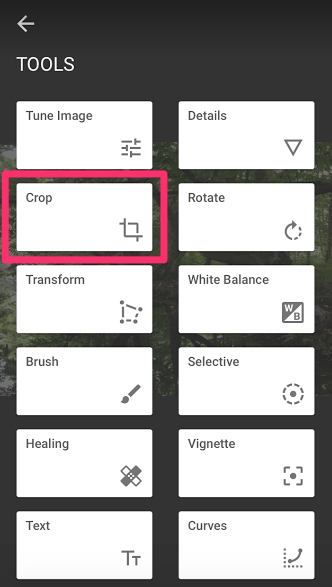
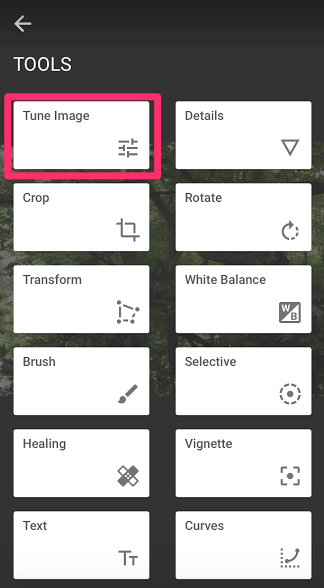
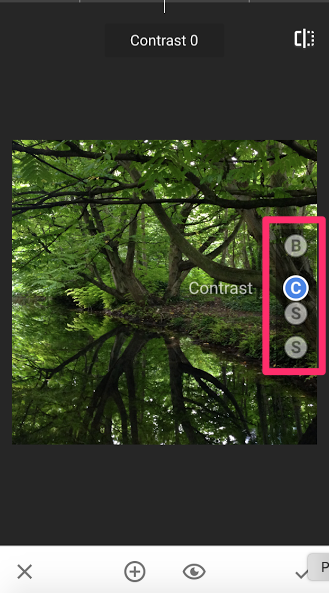
Here you can see all of the different options divided into a menu of three parts. First, there are the editing features.
I’m going to use the crop function first so that I can optimize for Instagram’s square format.
I select the square option from the bottom menu where you could choose other pre-determined formats or crop freely.
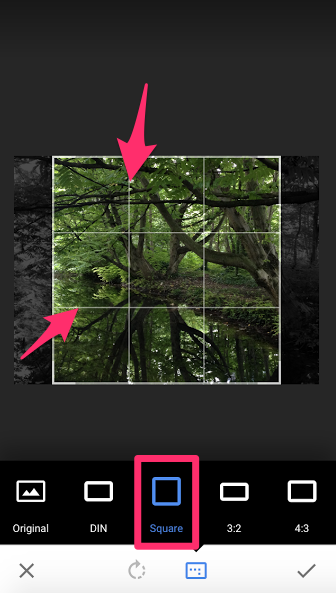
I want to point your attention to the vertical lines (which I’ve indicated with pink arrows).
Remember earlier when I talked about the rule of thirds? Well, in photography, those are the lines that are most attractive and harmonious.
If you have a horizon, for example, it should be along one of the horizontal thirds. If you are taking a portrait, the person’s eyes should be on one of the intersections of the third lines.
Snapseed makes it easy to see where you should be focusing your cropping to get the best possible photo.
Once the photo is cropped, I’m going to tune the image.
The next part is a little tricky if you’ve never used Snapseed before. In order to select the option that you’d like to tune, you need to touch the image with your finger and scroll up or down. That will open the menu.
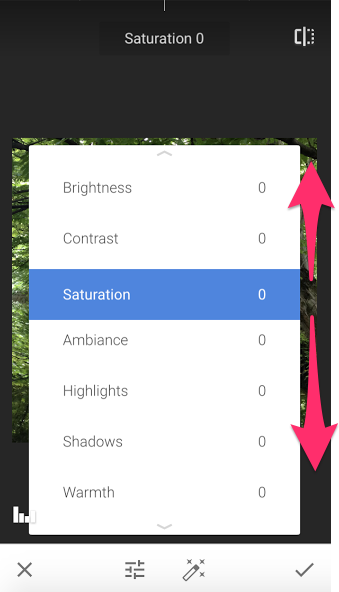
Stop scrolling on the option you want. I’d like to tune the saturation for this example.
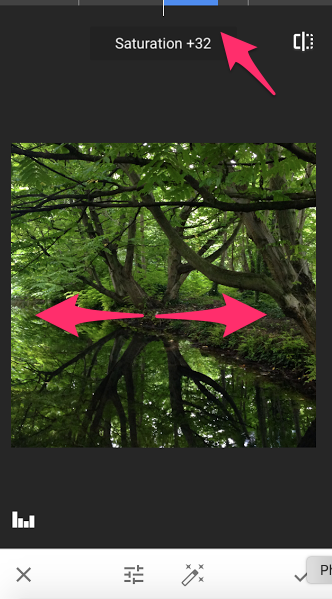
To adjust, scroll to the right and left. If you scroll right, you will increase the saturation. You can see the level on the top of your screen.
If you scroll to the left you will decrease your saturation.
All of the settings work like this in Snapseed, so remember that you scroll up and down to change which setting you’re adjusting and side to side to increase or decrease its effect.
My favorite option in Snapseed is the Selective editing. This lets you rework parts of your image without changing the whole thing.
Click on the Selective option from the main menu.
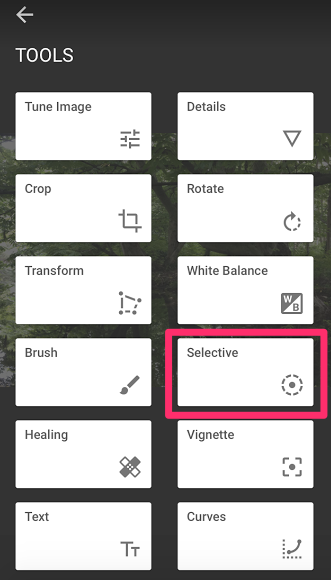
Then, click on the plus button on the bottom. This will let you select the region of the image that you’d like to adjust.
Click on the part you want to edit. I’d like to work on the tree on the right so I click on it to place the marker.
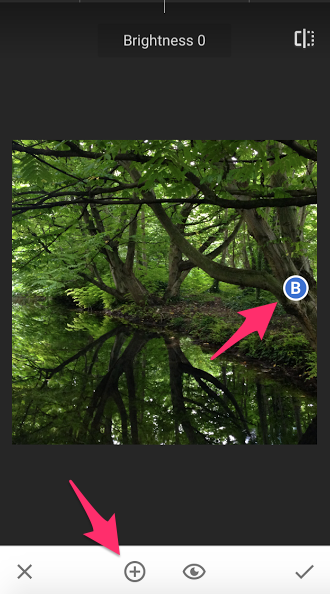
Once your marker is placed you use the same interaction of swiping up and down to move between the options. You can adjust the saturation, brightness, structure, and contrast.
Once you’ve selected the setting, you scroll side to side to increase or decrease the effect, just like we did earlier in the Tune Image menu.
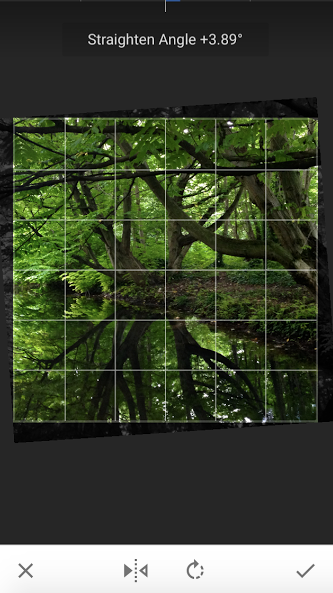
In addition to adjusting the colors, light, and saturation, you can rotate your image.
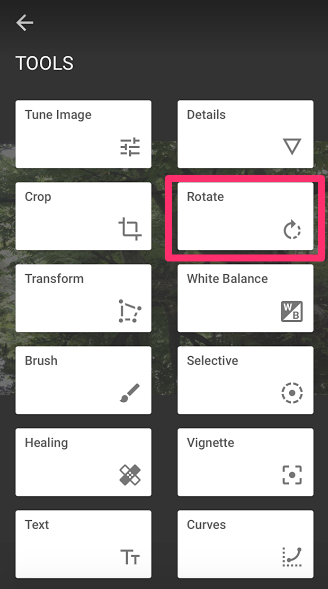
It will automatically suggest a correction if there is a clear horizontal line that is not flat. Or you can control the angle of rotation that you want.
When you scroll down to the second part of the main menu, you get to more advanced options. The first is the lens blur.
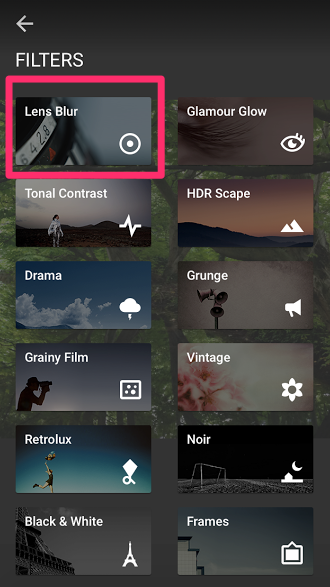
The lens blur option can add depth and focus to your image, in either circular or linear format, by clicking on the icon at the bottom.
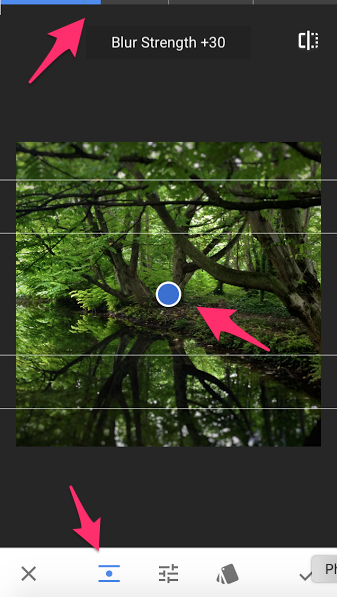
Then, you can move the center of focus around with the blue dot. You can expand or contract your area of focus.
And finally, you can intensify the blur effect with the side-to-side scrolling action.
There are also tons of different filters and effects that you can apply directly. Retrolux, Glamour Glow, Drama: all of these can be applied, and the effect can be lessened or intensified.
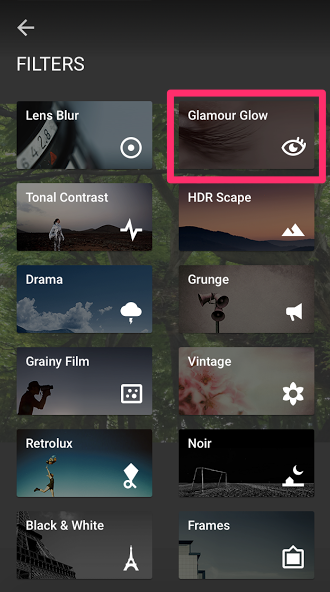
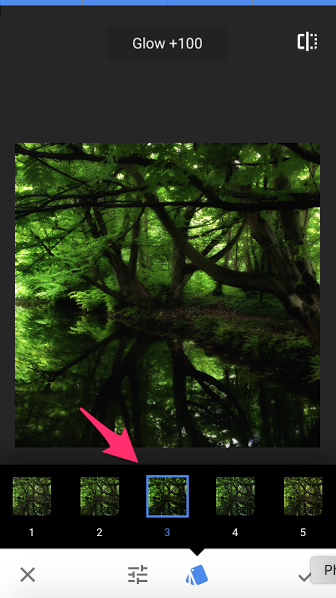
Glamour Glow, for example, brings you into a dreamscape. You can select different types of glow by using the options at the bottom.
This is only scratching the surface of Snapseed. I highly recommend trying different functions with different types of photos so that you can see the wide range of possibilities.
App 2. VSCO Cam

It’s very similar to Instagram in that regard, as well as in their mutual functionalities.
To use VSCO, you have to create an account.
Once that’s done, you arrive in your Studio. From here, you can either take a photo (at the top) or upload an image.
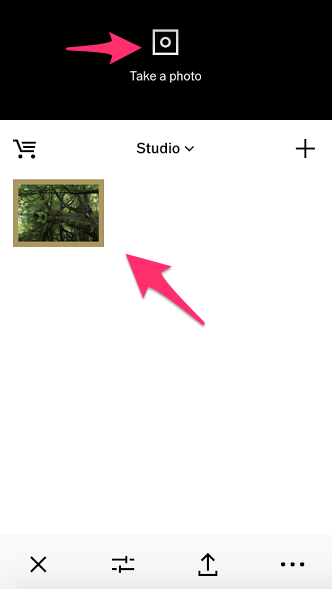
Click on the image to edit it.
The first thing you can do is add a filter, and VSCO has a lot of them.
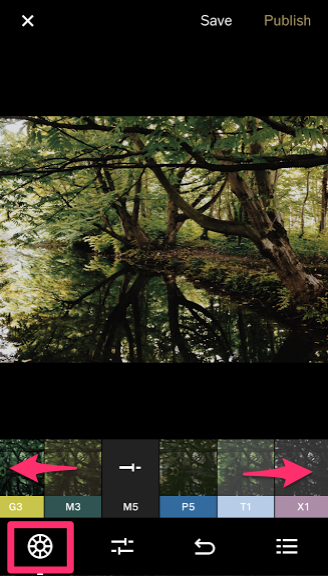
Horizontally scroll through the filters to see all of them.
The next option on the bottom menu is Adjust.
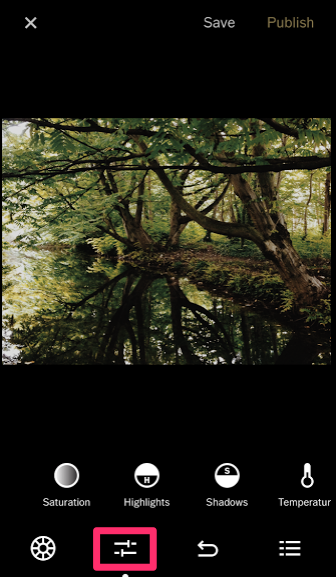
Again, you’ll find a wide menu of options by scrolling to the right.
VSCO is highly recommended for its ability to beautifully manipulate light. Here is what happens when you add more light to the shadows.
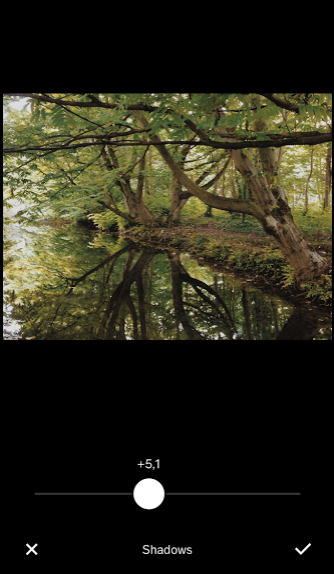
My favorite option is at the end of the same horizontal menu. There are actually two of them that do the same thing but in different ways: Shadows Tint and Highlights Tint.
These options enable you to adjust the color structure of the highlights or shadows in stunning ways that look as good as a template filter.
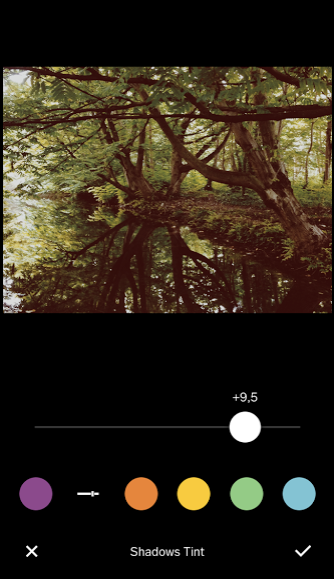
That’s a big differentiator and a great argument to use VSCO over the options native to Instagram
App 3. Quick
Quick lets you add text. Nothing more, nothing less.
Their whole goal is speed.
When you open an image, text is already added for you to modify.
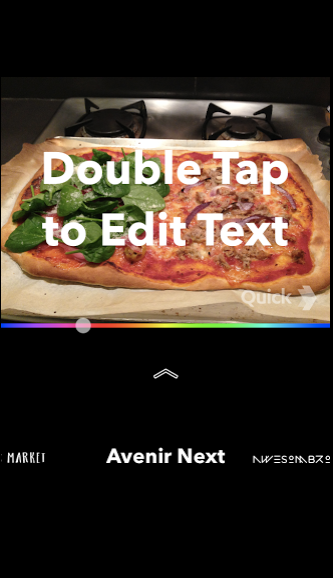
Like the instructions say, double tap to open the text editor.
Write what you want. Then swipe side-to-side on the fonts to select the one that looks best.
Drag the text around to reposition it.
And finally, there is a very cool interface for selecting the color. Swipe along the colored line. If you move your thumb up while holding down, the color darkens. Move your thumb down and it gets lighter.
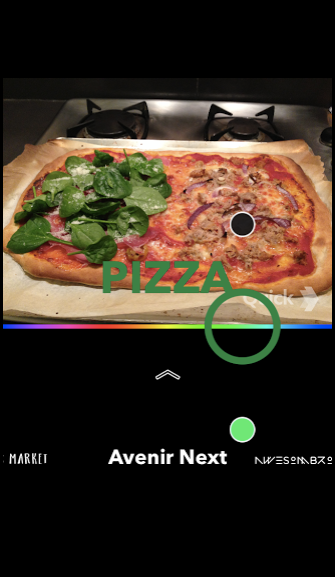
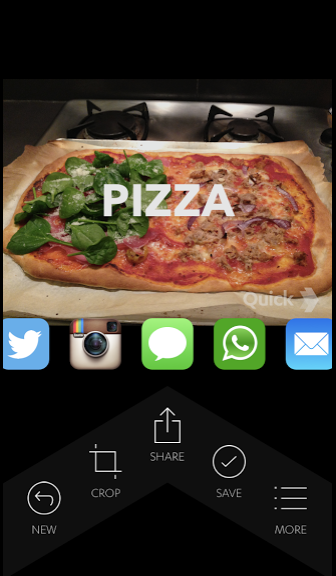
When you’re ready, the share buttons are a click away.
App 4. Tangent
I’ve shown you a few photo-editing apps and one for adding text, but Tangent goes in an entirely different direction.
You know all of those trendy brands using geometric shapes?
That whole world can be open to you with Tangent.
It’s not free, so you’ll have to shell out a few bucks. It’s completely worth it if artistic photos are what you want to create.
There are two ways to get started on the home screen. The left button lets you edit one of your photos. The right button takes you to a feed of original creations to get your creative juices flowing.
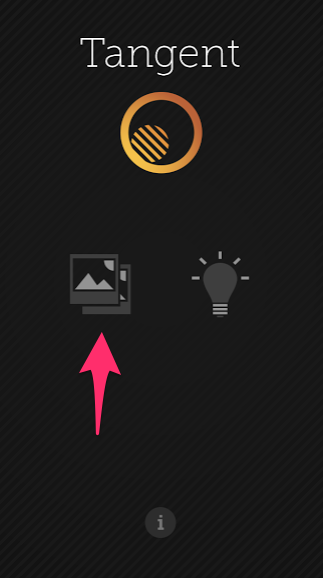
When you’ve got your photo loaded, it will ask you if you want a Fresh Start or to use a template.
Click on Fresh Start and you will arrive at the editing screen.
At the bottom, there are three options:
- The shape option will let you add a shape to the image
- The pattern option will overlay the effect across the entire image
- The color option will let you adjust the color of your object or pattern
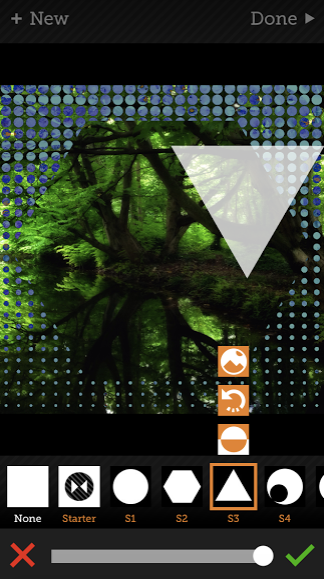
Click on the shape option. This is where it really gets wild.
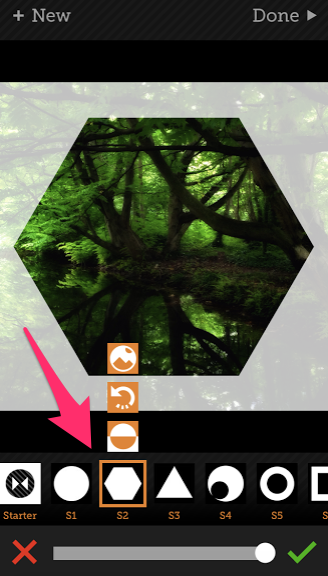
There are tons of different options to play with here. The white shaded area is the element that I’m adding where I will apply a pattern. I can inverse the white shaded area so that it’s the inside of the hexagon.
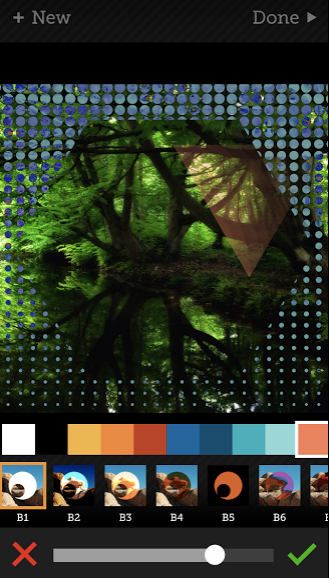
When you’ve selected and adjusted your shape, click on the pattern button from the previous menu.
You get this view and an equally impressive array of graphic options:
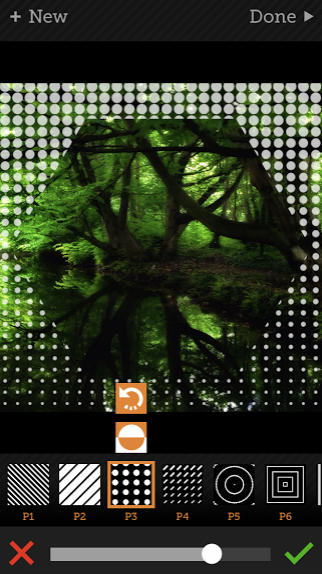
The horizontal menu goes on for a while, so you should try out as many options as possible. You can pinch to make the patterns more or less dense. And the slide on the bottom controls the transparency.
The final step is to apply a color.
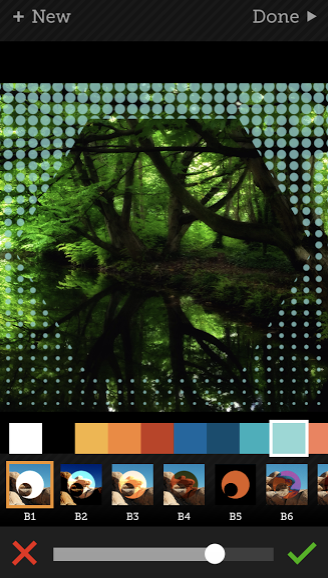
You can choose a solid color or one of the color filters from the menu.
If you want to add a different shape on top of your first layer, instead of sharing the image right away, you can click the Retangent button.
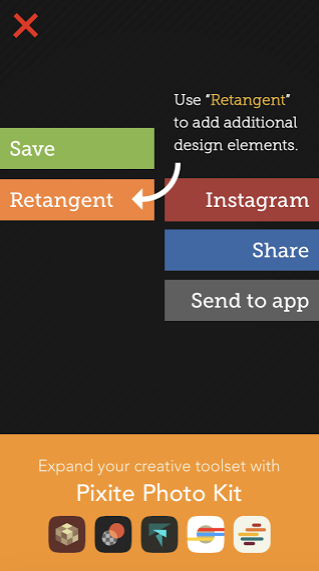
You can add continue to add layers.
And edit them too.
App 5. Splice
Now that you’ve got the different angles of photo editing covered, I’d like to show you my favorite app for editing and enhancing videos.
I’ve already shared how to create a marketing video with you on my blog. This is more for enhancing videos that already exist.

Splice is not only a video editing app, but it’s also a photo montage creator that will automatically build videos from a collection of photos.
It’s owned by GoPro, so you can trust that they know a thing or two about how to make awesome videos.
And it’s free.
Since we’re talking about enhancing videos for Instagram, I’m not going to talk about the photo-montage option, but rather focus on how you can use Splice to edit your existing videos.
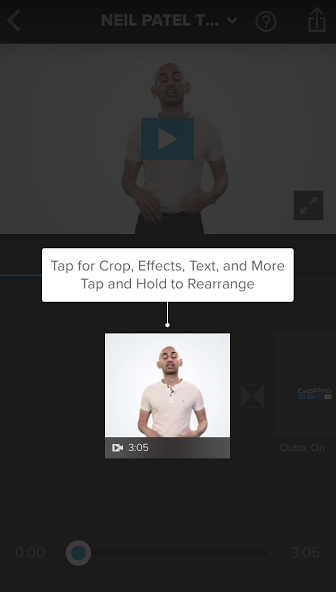
Start by starting a new project.
It will prompt you to select the photos and videos you want to upload. I’m going to use my recent video about increasing email deliverability.
Here it is for your reference (and some Neil Knowledge).
There is a step that I’m going to skip since I’m not making a montage, but I could use this to add music to the video. Splice offers some prefabricated music tracks in different styles to accompany your video.
You could also upload a track directly from your iTunes on iOS.
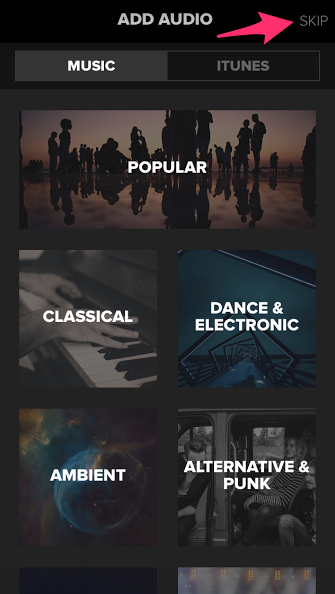
I’m going to just skip this step using the button at the top right.
Then you come to a very important screen where you select the settings of your video.
Since we’re talking about Instagram, square is still the default format and the best way to ensure that people see your video as you intend it.
Splice will reformat your videos for you if you select the square option.

This alone is worth downloading the app since it’s one of the best free apps out there to reformat your videos for Instagram’s format.
Then you get to actually edit your video. The tutorial that overlays the first time you use the app is pretty helpful.
Basically, you’re going to see your videos in a sequence going from left to right.
Click on the part you want to edit, like the tutorial says.
The menu will pop up, giving you different options. The blue plus buttons on either side let you add media before or after the part that you are going to edit.
Click on Edit.
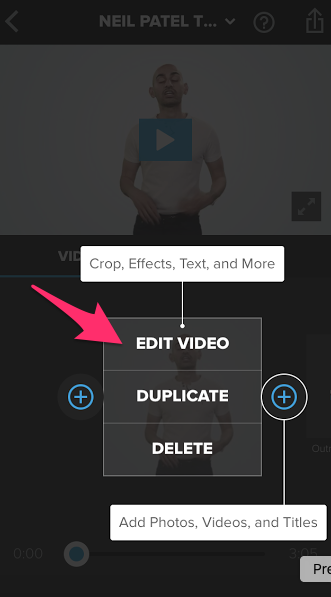
You will see the editing menu on the bottom of your screen.
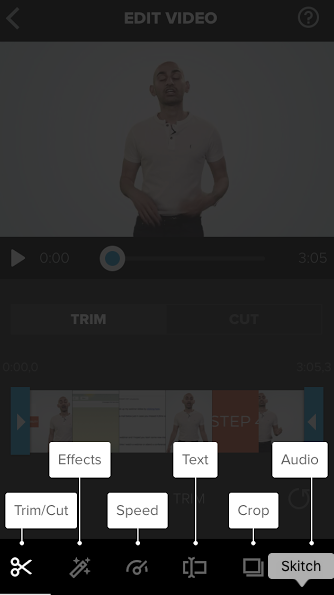
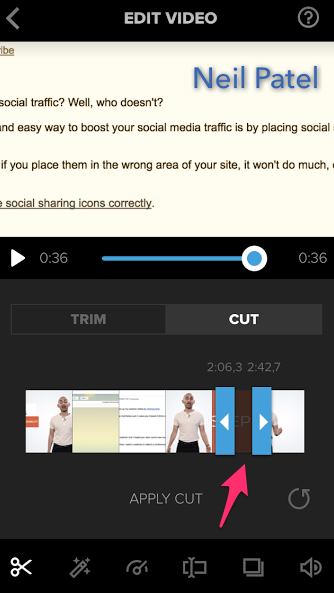
The first thing to do with Splice is to trim or cut your video.
The trim option lets you place two markers: one at the beginning and one at the end of your video.
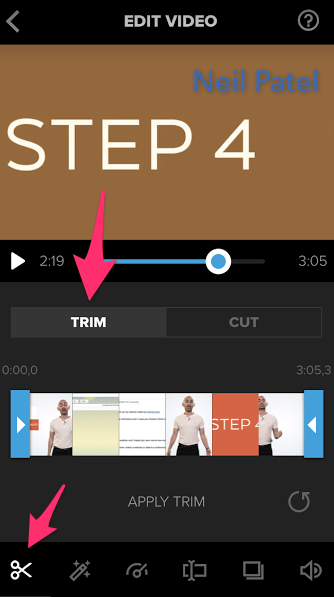
When you apply the trim, Splice will cut the beginning and end of your video off, keeping only the part of your video clip that’s inside your blue markers.
The cut option is the same thing but in inverse. You can cut out a part of your video and keep the rest.
Just adjust the blue markers to isolate the part you want to remove.
The Text option lets you add text to all or a part of your video.
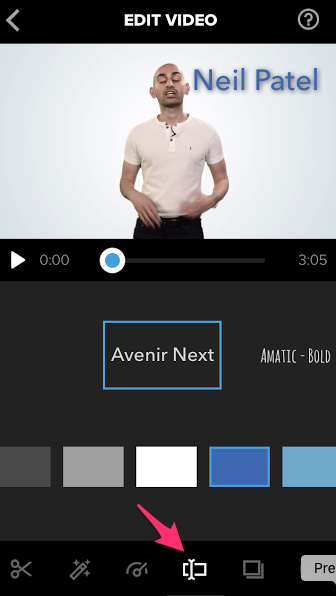
Like the Quick app described above, there are a bunch of different fonts to choose from.
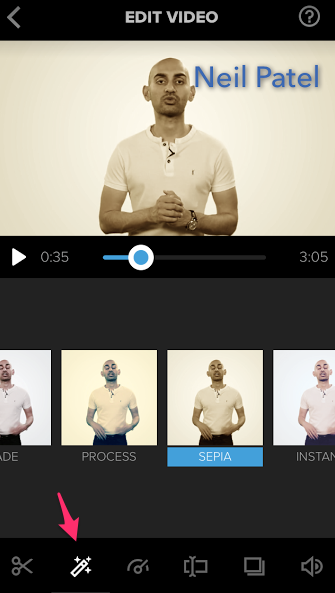
You can click on the effects button to change how the video looks by adding a filter.
This is what I look like in Sepia:
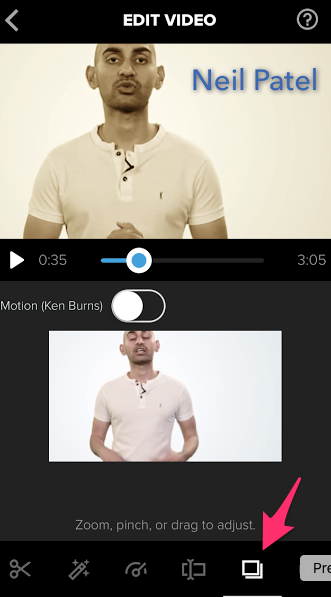
One of the best features is the crop option, which will let you zoom in on a different part of the frame. This is great when you have a cool shot but you want to draw people’s attention to something specific.
The last feature I want to talk about is sound since Splice lets you do a lot of interesting things with music and other noises.
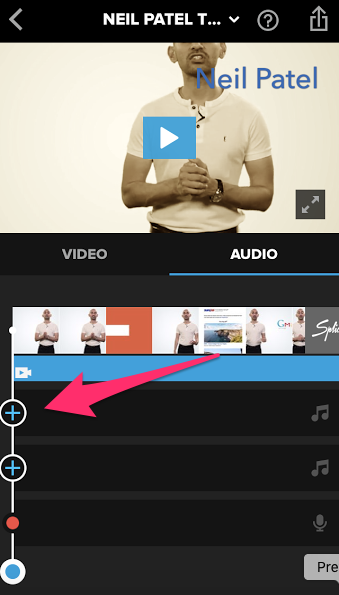
If you skipped the audio step at the beginning like I did, you can always add sound later. Click the blue plus button to add a track.
Pro Tip: To spice your video up, try adding fun sound effects. You can download free sound effects in MP3 form here.
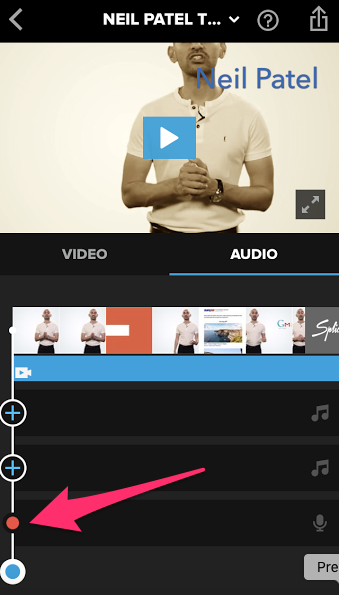
Finally, you can easily add a voice-over to your video. Click the red record button and you can narrate as the video plays for you on your screen.
If you’ve been following me for a while, you know that sound is an untapped territory for marketers.
App 6. Boomerang
No article about enhancing images and videos for Instagram would be complete without mentioning Boomerang.
If you use Instagram, you’ve definitely seen it. Basically, Boomerang makes a video loop that repeats.
To use the app, find something that’s moving and hold down the record button.
It’s made by Instagram, so the interface is super easy to use. You can watch the promotional video for it here.
It’s impossible not to have seen a few Boomerangs considering that the app has been installed nearly 100 million times.
Conclusion
As you can see, the apps available for enhancing your images and videos make the possibilities endless.
From developing an individual and unique graphic style to creating legitimate works of art, like Apple used to say, “there’s an app for that.”
The key is to practice. At the beginning, your photos and videos might come out looking a little bit too reworked.
Experiment with each app to find which one (or ones) are right for you!
Try adding pre-made filters. When you feel more confident, adjust specific settings to your liking, from exposure to saturation.
Add text overlays to help your audience connect with your images. Play with geometric shapes to add dimension.
Finally, don’t neglect video. Use apps to edit and adjust your videos before they go live.
All of these steps can help you get more attention on Instagram.
What apps do you use to boost your Instagram photos and videos?
The post 6 Apps to Enhance Your Instagram Pictures and Videos appeared first on Neil Patel.


Comments
Post a Comment